This post walks through the basics of importing data into your application from an Excel Table.
There is a lot of data that we work with that changes very rarely. We could always have our application do lookups from online lists, but sometimes it makes more sense to store that data locally within the application. This allows apps to be usable offline (e.g. mobile phones) and can also make apps more responsive.
I originally did all of my "app initialization" kind of variables/lists in SharePoint. Oh the stupidity of doing things the way Microsoft implies you should. Eventually, I learned better and started instead bringing in some basic Name/Value pairs in as static lists instead. Using Excel to manage this is a nice way to hand users some "almost keys" to maintaining their own applications w/o the inherent risk of them immediately breaking something if they enter the wrong value. Honestly, this is the right way to do it for any basic data components that your app relies upon and is remotely modest in size.
Keep in mind that this is a COPY of your Excel data. It is not linked to your spreadsheet. You would need to re-import the data anytime your Excel data changed and re-save/publish your application so that users would see the updated information. Therefore, only do this for information that is very static (or commit to updating your application regularly).
Keep in mind that this is a COPY of your Excel data. It is not linked to your spreadsheet. You would need to re-import the data anytime your Excel data changed and re-save/publish your application so that users would see the updated information. Therefore, only do this for information that is very static (or commit to updating your application regularly).
From a high level, all data imported from Excel is viewed as a "Data source" within PowerApps, but it really is just a static Collection. So any operation you can use to view/consume a collection can be used against the data you import.
Step-by-Step
In this example, I have created a list of information in Excel with some column headers that shows some details for a series of locations that we might use as the source for our users to select from.
For PowerApps to import data from Excel, it must be in an Excel Table. So, in Excel, highlight your headers and rows/columns, then click Insert | Table | OK.
Finally, we should name our Table something that makes sense to us. Edit the Table Name to be LocationDetail.
The reason we need to do this within Excel is because once we have imported it into PowerApps we cannot rename it. So naming it something that we will remember within Excel is a very important step.
The reason we need to do this within Excel is because once we have imported it into PowerApps we cannot rename it. So naming it something that we will remember within Excel is a very important step.
Now we're ready to import. In PowerApps, click on View | Data sources. Why isn't this under Insert? Reasons. Very mysterious reasons.
A window will pop up to the right on your screen. On it, select + Add data source.
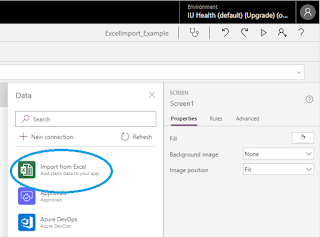
A list of potential data sources will appear in the same Window. From it, select Import from Excel.
The same Window will now display a list of all the Tables our Excel file contains. Select your (now appropriately named) Table and then click Connect.
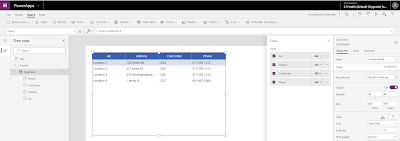
Now the data exists within your application and can be referenced like a Collection. However, to prove it, let's click Insert | Data table and edit its Items property to connect to our new LocationDetail collection.
If you ever need to edit the fields shown in a Data table after creation just select it, then look to the right-hand side of the screen and click on the Fields value (right below Items) and the same window will appear again.
Now, if you're an anal-retentive kind of Excel person (is there any other kind?), then you'll notice that I gave a bad name to one of my columns (purposefully?). This is the kind of naming issue that we can fix/edit within PowerApps. If your Field list Window is still open then you can just go there, otherwise, select your Data table (e.g. DataTable1) to the left-hand side of the screen, then click the Fields value on the right-hand window. Now press the ellipsis (...) to the right of the field you want to rename, then click Advanced Options.
Find the DisplayName field in the right-hand window and edit it to be the correct one.
Now your users see the correct value. Of course, our column still has the original name from the imported Table. I did mention something about anal retentive Excel people, didn't I? Go to the left-hand window and under your Data table select the ellipses (...) next to the column you want to rename, click Rename and change the name.
Now everything is imported and named correctly (both for us and for end-users).
Final Thoughts
Data tables are only one way in which we could view/use this data. We can also use this information to populate other Controls within PowerApps (e.g. Dropdown, Combo box, List box, Galleries, etc.).
For more details on the various ways you can manipulate and use static data, see my post on Creating Collections Manually and Using Them.
In truth, while this does enforce some manual processes on you (remove the data source, re-import the Excel file and Table, re-save the app, re-publish the app), this is something that you should be doing regularly anyway to make sure your application is running/working on the latest PowerApps engine. If you wait until you get automatically upgraded to the newest engine, then you won't have the luxury of time to fix things since before then you can still roll back to older versions (of the engine, not your app - you can always roll back your app).
In truth, while this does enforce some manual processes on you (remove the data source, re-import the Excel file and Table, re-save the app, re-publish the app), this is something that you should be doing regularly anyway to make sure your application is running/working on the latest PowerApps engine. If you wait until you get automatically upgraded to the newest engine, then you won't have the luxury of time to fix things since before then you can still roll back to older versions (of the engine, not your app - you can always roll back your app).
Reminder, static data that you import from Excel is simply that: STATIC. You are not linked to your Excel sheet and any changes you make to the sheet or within you app will not be replicated to the other.


No comments:
Post a Comment
Because some d-bag is throwing 'bot posts at my blog I've turned on full Moderation. If your comment doesn't show up immediately then that's why.
DIAF Visualpath team