Others have written this up, and I smoothed out the errors I was hitting through Matthew's blog post here. However, I wanted to draft up a slightly different take just to clarify some gotchas as well as solidify the use-case.
This approach fits w/ a series of other posts I've done on:
- allowing users to interact w/ SharePoint data they don't have rights to
- reading JSON data into Collections using Power Automate
- writing JSON data from Collections using Power Automate
Let's cover how to set up the Power Automate side first as that is the more recent black magic that needs to be sorted out. There are a few gotchas here to address that might ruin your day.
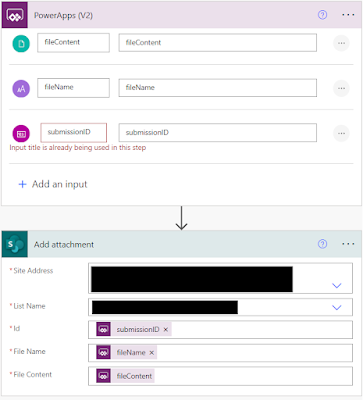
Adding Attachments to a List Item
The Power Automate script above is all you need, but there are a few tricks you need to get this working properly.
The Power Automate script above is all you need, but there are a few tricks you need to get this working properly.
Make your File input REQUIRED!
In my screenshot above, I have a file input named fileContent. In order for your PowerAutomate script to work properly (currently - who knows future-state?) you must make this required. Click the ellipsis to the right of your File variable and make it required.
 |
If you forget to do this, then you can get yourself in a mess of troubleshooting. At present, you might have to fix this, then remove it from your PowerApp, then re-add it. Refresh might not work for fixing this. So just remove/re-add. Oh, and you also might have to exit your PowerApp before you re-add it. Yay Microsoft!
Pass in the Filename
This isn't a requirement, but is a recommendation. Most others who show how to do this just explain how to pull the filename out of the File object already being passed in. The problem here is that...Power Automate is awful.
You are going to have to pull the filename out of the control (or create a new filename say for a photo) in order to create the File object in the first place. It is much easier to do that work in PowerApps than in Power Automate. So even though their method will "save you from having to pass in the filename", just stop trying to act smart by doing dumb things. Pass in the filename and make your code more legible. Future you will thank you for this. As will anyone else who has to read your garbage later.
Create the File Object in your PowerApp
I will re-iterate this below, but you can't just pass in a File from your PowerApp either through the camera control or by copying/pasting the Files|Upload control from a form and passing it directly. You have to create a "File Object" that Power Automate understands. The easy answer to this is that it is just a Collection of both the filename and the contents of the file. So what you're Power Automate script is expecting to see inside the File object is:
{
contentBytes: ...//content of your file,
name: ...//name of your file
}
That is a two name/value pair, single item Collection. You cannot pass in multiple files at once. However, you can call your Power Automate script in a ForAll() loop to write multiple files.
Now for your PowerApp...
How to Get Files into Your App?
- The Camera control is included by default and is easy to add. But you will need to create a name for all photos (and probably unique ones).
- The Forms Attachment control must be copy/pasted out of an existing Form
The Camera control is fairly simple to start, so let's focus on the Attachments control.
Getting a File Upload (Forms Attachment) Control Outside of a Form
Since PowerApps doesn't have a File Upload control by default, you'll just kind of hack your way into copying one out of a Form. Don't ask me why it isn't there by default.
The quick steps are as follows:
- Connect your PowerApp directly to any SharePoint list that allows Attachments (the default)
- Add a Form to your app
- Connect the Form to the SharePoint list above
- Copy only the exact control (not the whole datacard, see below) for the attachments and paste it on a new page in your app.
- Delete the Form
- Delete the SharePoint connection
This gives you an Attachments control that will allow uploads by end-users w/ some minor tweaks.
 |
| Look for the paperclip icon in the left-hand pane |
This new pasted-in control will throw a red X because it is still linked to the original Datacard and form., so you'll need to make a few changes to fix some things. You can just click on the X over and over and blank out the values until it disappears, but these are the items that need to be fixed:
- BorderColor (erase everything)
- Items (erase everything)
- ToolTip (erase everything)
- DisplayMode (change to DisplayMode.Edit)
Once this work is done, it is a good idea to just save a copy of this in your default template you use for your applications so you can use it again and again.
What you're left with is this:
How to Create a "File Object before sending it to Power Automate?
You might think that just dropping this file into PowerAutomate would work, but it will not. PowerAutomate expects a "single item Collection" (or record) that includes two very specific values so that it understands the file format.
The structure of this is as follows:
{ contentBytes: ?? //file content name: ?? //file name }
The two fields contentBytes and name have to be spelled exactly as listed and must be populated. Otherwise, if/when you pass a "file" to Power Automate it won't understand what it is.
If we imagine that there is only one file in the file upload control (e.g. filesToUpload) above, then the following would the correct value to pass to Power Automate:
{ contentBytes: First(filesToUpload.Attachments).Value name: First(filesToUpload.Attachments).Name
}
That is taking the first file in the upload control (named filesToUpload in my example) and putting the "Value" (e.g. content) in the contentBytes field and then putting the "Name" (e.g. filename) in the name field.
If we pass this to Power Automate, then it understands this as a File and it will work properly.
Ultimately, if our control allows multiple items to be added to the control by the end-user, then we'd not just pass in the first value, but all values one at a time. Since we cannot pass in multiple values at once, we simply call our Power Automate script once for every file.
Let's assume we have a Power Automate script (as I showed above) that takes in 3 inputs as follows:
- fileContent = File
- fileName = Text
- submissionID = Number
Above, I am using the "As nextItem" code to create a reference that makes it easier to refer to items within the ForAll loop. Sometimes the equation editor can get confused if you don't explicitly tell it which thing you're referring to.
As well, I've simplified the code temporarily to just hardcode an ID for SharePoint. We will come back to this later below w/ a more complete example.
This code, would loop through each file attached, and run our Power Automate script once for every single file. One after the other, it will attach them to our specific SharePoint ID (1 in the above example).
Attaching Photos Instead of Files
As I mentioned above, the Photos control is a bit easier as the Camera control is there by default. However, the work is similar to above.
This creates a unique filename for each photo as they are taken (using the GUID() command) and a unique ID as well (pretty much the same as the filename), then puts the content of the image in also.
This structure is what PowerApps expects to see if it gets something inserted into an Image control. So if we pass in the above Collection submissionImages to a Gallery w/ a single Image control inside it, then all images will appear as the Camera snaps more photos.
While this is fine for PowerApps, PowerAutomate doesn't understand this at all. We have to essentially push our photo information into a slightly different structure before we send it to Power Automate.
To make this super-simple though, you could just drop in the following code that is similar to our Files code above:
I've bolded the changes above, however, the rest is identical. We're just looping through our photos vs. our files.
Putting this together with a SharePoint Patch() or UpdateIf()
The gist of everything above should answer most questions, but if you're a beginner you might be a little confused by me assuming the SharePoint ID simply being 1. The assumption is that we first need to create and/or get the SharePoint ID from the record we want to attach this to. So the process is:
- create or load the record we're going to attach the files to
- run the Power Automate script to attach the files
Let's start w/ the assumption that our user is going to enter some information that we will write to SharePoint first and create a record, then we'll attach the files to that. Consider the following code:
This assumes a SharePoint list named mySharePointList and is updating the Title field just w/ a simple value of "New Record". This returns a Collection of the newly created record w/ all the values that SharePoint created by default. One of those values is the ID.
So now, we have a new local variable named createdID that gives us the value we'd need to send to PowerAutomate.
So now, if we assume we had a Files and Camera control in our app that ran after the above code, it would look similar to the following:
The key here is that we first create the Record in SharePoint we need to attach the files/photos to, then we attach each.
Of course, this probably isn't exactly how we'd do this. Because, the code we used above to create a record is assuming we have a direct connection to the SharePoint list. We started this journey assuming we do not have that. Instead, the way we'd create records is similar to my blog post here. At the end of this, we'd return the ID value back from Power Automate to PowerApps.
Final Thoughts
We could of course try do this all in a single step and a single call to PowerAutomate, but we would need to not use the File input for Power Automate and instead do this all through a Text input that takes JSON. We'd need to put all Files and data to create the record into JSON and allow Binary content. While this *might* work, I start to worry about the # of files a user might attach and the limits of JSON -> Text conversion for a single Power Automate query.
I also would suggest you consider returning a status variable back from each of your Power Automate scripts to let your PowerApp know if/when each one completes and also return error codes as applicable. I have had enough scenarios where I get throttled or PowerAutomate times out that you probably should handle these to ensure all files get attached properly.
Matthew does still have a good walkthrough of this specific to Document Libraries vs. doing Attachments. I'd suggest reviewing his post as well just to get an alternate perspective on certain parts of this.
No comments:
Post a Comment
Because some d-bag is throwing 'bot posts at my blog I've turned on full Moderation. If your comment doesn't show up immediately then that's why.
DIAF Visualpath team